
How to Learn Chest X-Ray Interpretation Step by Step

To get the most from a chest x ray course, check image quality and positioning first. Then use the same reading order every time: airway, lungs and pleura, heart, diaphragm, and finally bones, soft tissues, and medical devices. Study normal films before tackling findings such as pneumonia, pulmonary edema, and misplaced tubes.
A repeatable routine helps you spot changes without skipping parts of the image. As you practice, compare each finding with the patient’s symptoms and know when the X-ray alone cannot answer the clinical question.
I’m Zita Ewert, and I lead continuing education for imaging professionals at Scrubs CE. My experience making practical, self-paced imaging education accessible shapes this chest x ray course guide.
Chest x ray course word roundup:
Core Components of an Effective Chest X Ray Course
A solid curriculum begins by addressing the technical diagnostic quality of an image before any anatomical interpretation starts. If an image is underexposed, rotated, or taken during shallow expiration, normal structures can mimic severe cardiopulmonary disease.
When we evaluate image quality, we focus on four primary pillars:
- Penetration: On a properly exposed radiograph, you should faintly see the thoracic intervertebral disc spaces behind the cardiac silhouette. Overpenetration makes lung fields appear pitch black (burning out subtle lung nodules), while underpenetration creates diffuse whiteness that mimics pulmonary infiltrates.
- Inspiratory Effort: Adequate inspiration is confirmed when 8 to 10 posterior ribs (or 5 to 6 anterior ribs) are visible above the dome of the right hemidiaphragm. Poor inspiratory effort crowds the basal bronchovascular markings, which can be easily confused with lower lobe consolidation.
- Thoracic Rotation: The medial ends of the clavicles should be equidistant from the spinous process of the adjacent thoracic vertebra. Rotation alters the mediastinal contour, exaggerates cardiac size, and creates artificial density differences between lung fields.
- Motion and Angulation: Apical lordotic angulation projects clavicles above the lung apices and distorts cardiac shape. Patient motion introduces blurring that obscures subtle interstitial markings.
Understanding these variables requires a firm grasp of the ABCs of X-Ray physics, anatomy, and perfect positioning. Modern curricula align with professional guidelines, such as the Society of Thoracic Radiology curriculum, which spans 15 video modules covering essential pulmonary, cardiac, and mediastinal imaging fundamentals.
Foundational Anatomy and Radiographic Positioning in a Chest X-Ray Course
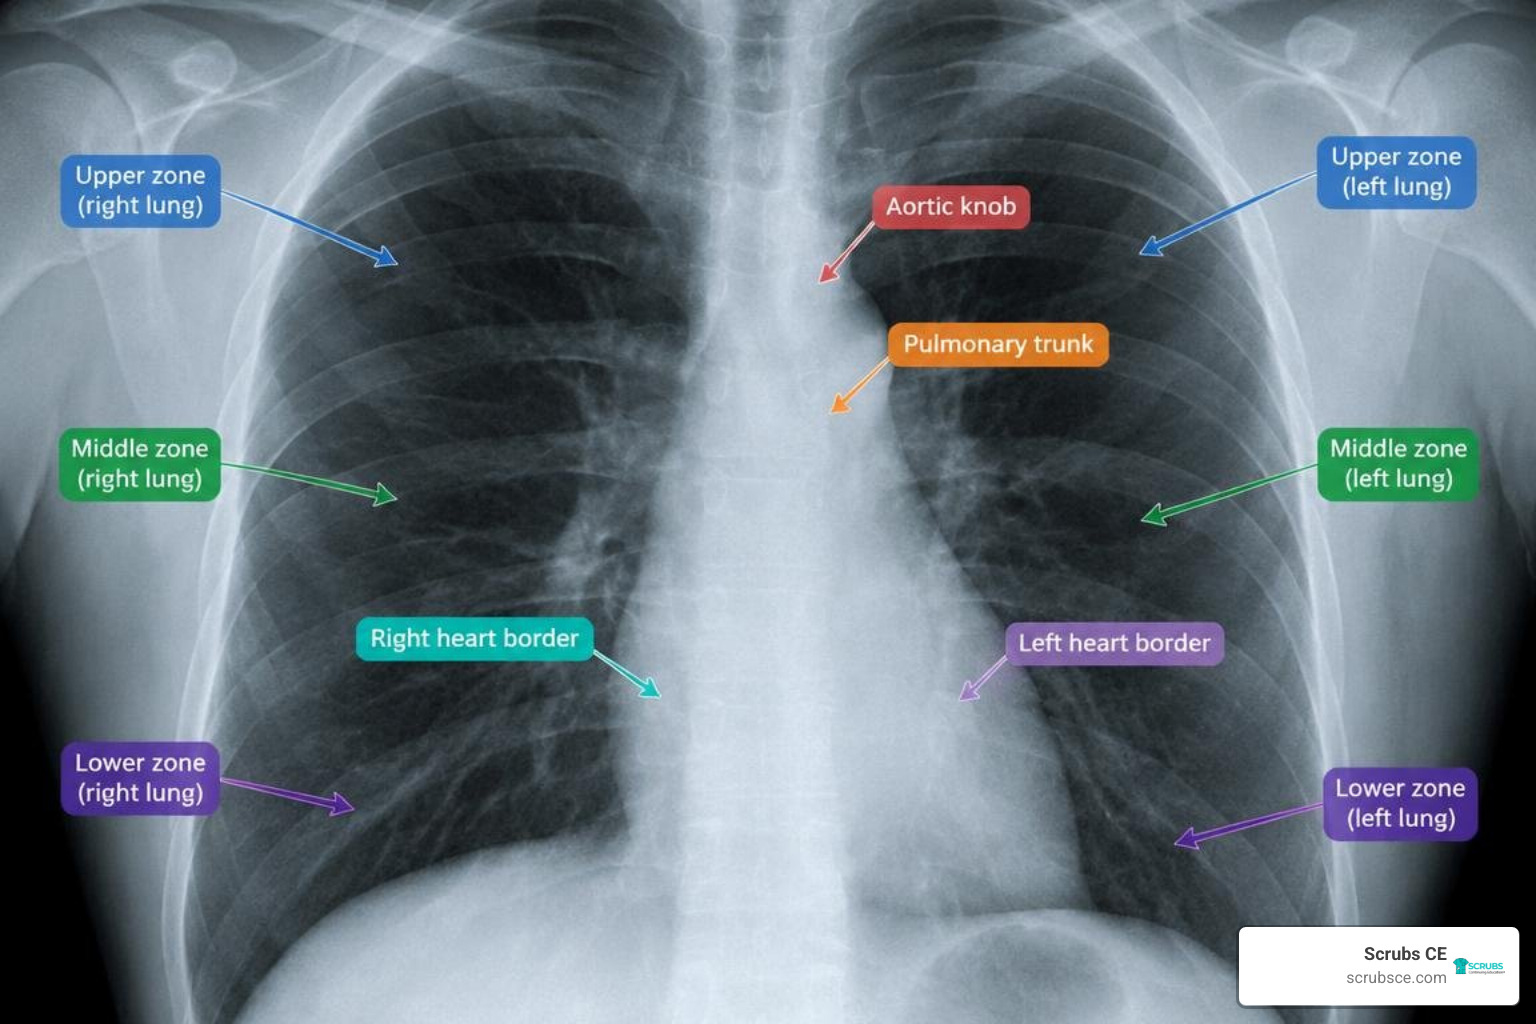
Mastering thoracic interpretation requires an understanding of how 3D anatomical structures project onto a 2D radiograph. Key cardiothoracic landmarks include the aortic knob, the pulmonary trunk, the right and left heart borders, the hilar contours, the lateral costophrenic angles, and the cardiophrenic sulci.
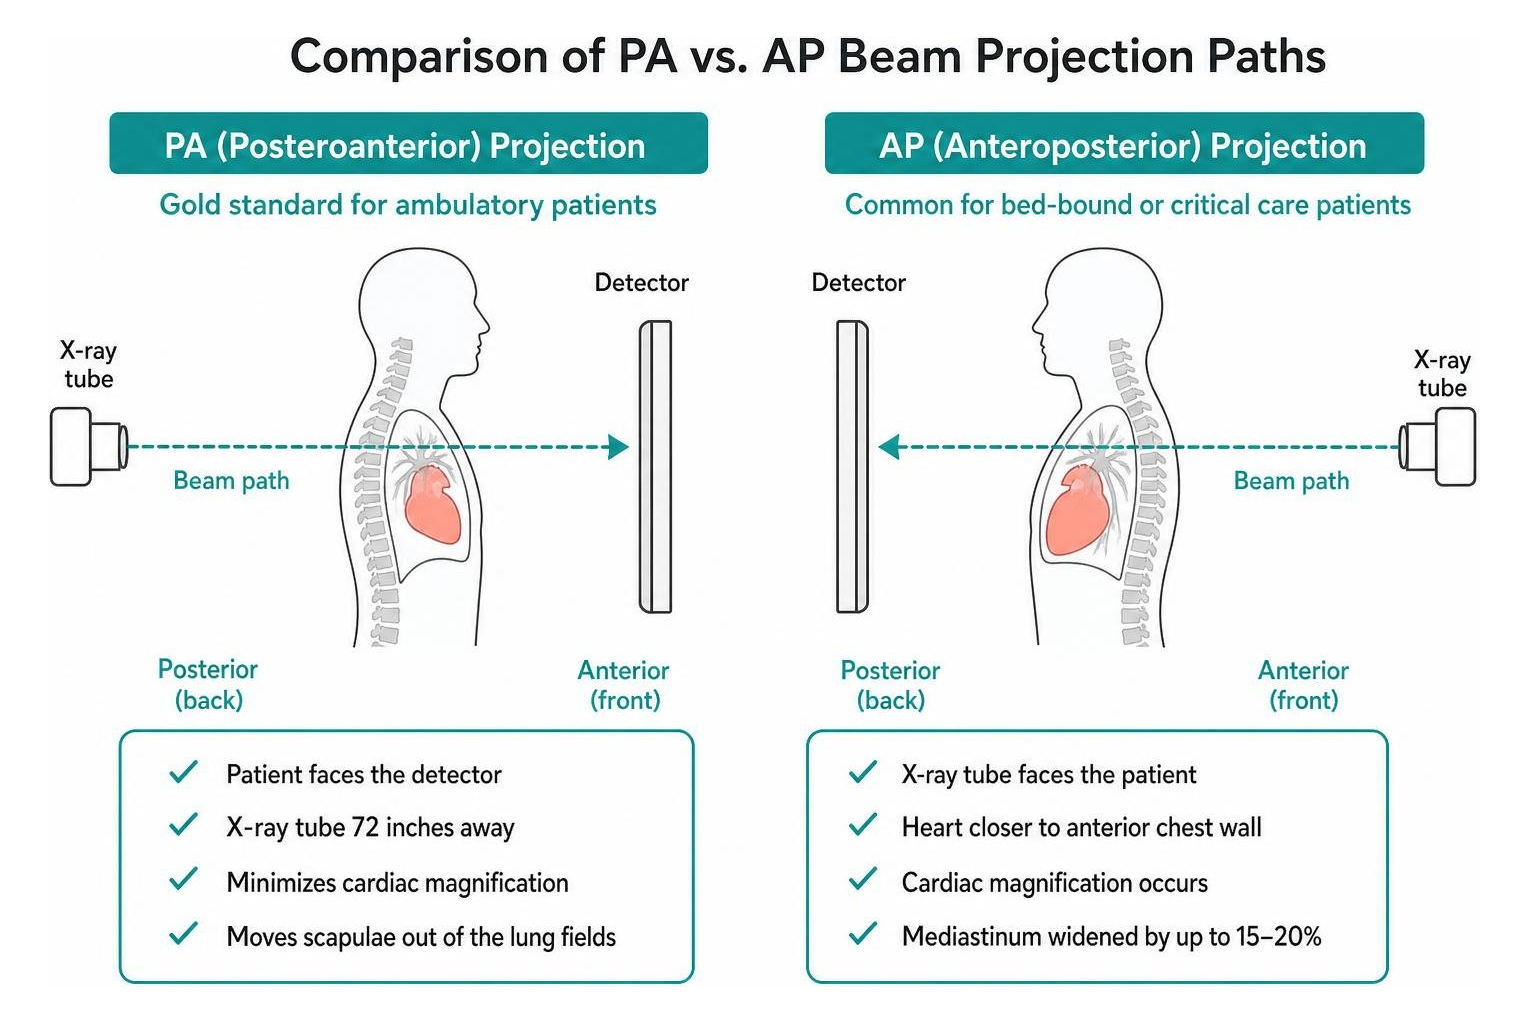
Understanding radiographic positioning allows clinicians to select the right projection for the right clinical question:
- Posteroanterior (PA) Projection: The gold standard for ambulatory patients. The patient faces the detector with the X-ray tube 72 inches away, minimizing cardiac magnification and moving the scapulae out of the lung fields.
- Anteroposterior (AP) Projection: Commonly used for bed-bound or critical care patients. Because the heart sits closer to the anterior chest wall and farther from the detector, cardiac magnification occurs naturally, widening the mediastinum by up to 15–20%.
- Lateral Projections: Vital for evaluating the retrosternal and retrocardiac “blind spots,” as well as confirming whether a lesion sits in the anterior, middle, or posterior mediastinum.
- Lateral Decubitus Views: Useful for evaluating mobile pleural fluid or assessing pneumothorax when cross-sectional imaging is unavailable.
Differentiating Normal Baselines from Pathology in a Chest X-Ray Course
The hardest part of learning chest radiography is identifying normal physiological variations and blood vessel artifacts versus genuine active disease. Novice readers often mistake normal branching pulmonary vascular markings for interstitial lung disease or early pneumonia.
To build visual intuition, clinicians should study normal case archives. The UPENN School of Medicine CXR Learning Website provides 100 normal chest X-rays diagnosed with “No Active Disease” (NAD) across diverse patient ages and sexes. Reviewing normal variants helps you understand how senile kyphosis, breast shadows, pectus excavatum, and vascular bifurcation alter baseline appearances.
Systematic Step-by-Step Approach to Radiograph Analysis
A disciplined, repeatable search pattern prevents premature closure—the cognitive error where finding one obvious abnormality causes you to miss a secondary life-threatening issue.
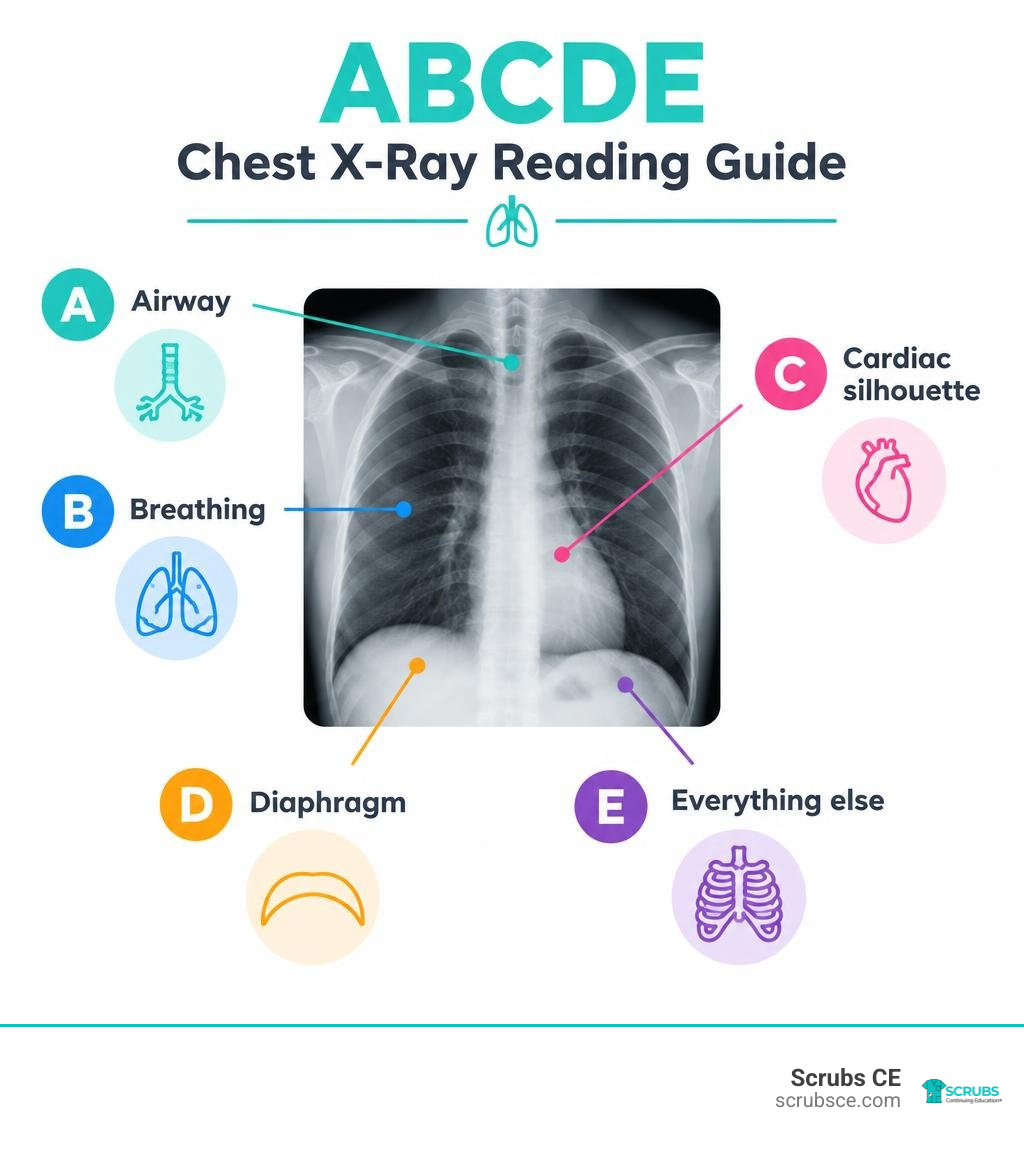
We recommend using the structured ABCDE interpretation method:
- A – Airway: Confirm the trachea is midline. Look for external compression, deviation caused by tension pneumothorax or atelectasis, and narrowing at the carina.
- B – Breathing (Lungs and Pleura): Divide each lung into upper, middle, and lower zones. Compare bilateral lung fields symmetrically from apices to bases. Follow the visceral pleural lines out to the chest wall to ensure there is no pneumothorax or apical thickening.
- C – Cardiac Silhouette & Mediastinum: Measure the cardiothoracic ratio (CTR) on PA projections; normal is 0.50 or less. Inspect the aortic arch, aortopulmonary window, right paratracheal stripe, and hilar heights (the left hilum normally sits slightly higher than the right).
- D – Diaphragm & Costophrenic Angles: Check that the right hemidiaphragm sits roughly 1 to 2 cm higher than the left. Ensure costophrenic angles are crisp, sharp, and acute. Look for free subdiaphragmatic gas under the right hemithorax.
- E – Everything Else (Bones, Soft Tissues, Tubes): Examine clavicles, ribs, sternum, and spine for fractures, lytic lesions, or osteophytes. Check the neck and chest wall for subcutaneous emphysema, and verify the position of any medical hardware.
Identifying Key Radiographic Signs and Densities
Chest radiography relies on five fundamental radiographic densities, ranging from least dense (black) to most dense (bright white): Air, Fat, Soft Tissue/Water, Bone, and Metal.
Pathology alters these densities, producing recognizable diagnostic signs:
- The Silhouette Sign: The loss of a normal anatomical border that occurs when an adjacent structure of identical radiodensity fills the space. For example, loss of the right heart border indicates right middle lobe consolidation, while loss of the left hemidiaphragm border indicates left lower lobe pathology.
- Air Bronchogram: Tubular lucencies (air-filled bronchi) branching through an area of white alveolar opacification, confirming parenchymal consolidation rather than pleural fluid or atelectasis.
- Lobar Atelectasis: Volume loss marked by shifting fissures, tracheal tug toward the affected side, and diaphragmatic elevation.
- Meniscus Sign & Blunting: Fluid collection in the pleural space blunting the sharp costophrenic angle. On an erect PA film, roughly 150 to 200 mL of fluid must accumulate before blunting becomes visible.
- Deep Sulcus Sign: An abnormally deepened, lucent costophrenic angle on a supine radiograph, serving as a primary indicator of pneumothorax in bed-bound patients.
- The Spine Sign: On a normal lateral radiograph, thoracic vertebral bodies appear progressively darker (more lucent) from superior to inferior. If lower vertebrae appear whiter (more opaque) than upper ones, it indicates lower lobe disease or fluid.
Clinical Interpretation of Critical Cardiopulmonary Pathologies
Recognizing common disease processes requires distinguishing between alveolar flooding, interstitial expansion, and volume loss.
| Feature | Pneumonia (Consolidation) | Pulmonary Edema | Lobar Atelectasis (Collapse) |
|---|---|---|---|
| Volume Status | Normal lung volume | Normal to increased volume | Marked volume loss |
| Fissure Position | Normal or bulging | Normal position | Shifted toward the opacity |
| Air Bronchograms | Frequently present | Infrequently seen | Absent (airway obstructed) |
| Distribution | Non-segmental or lobar | Bilateral, perihilar (“bat-wing”) | Specific anatomical lobe |
| Associated Signs | Silhouette sign, fever | Kerley B lines, cardiomegaly | Tracheal/mediastinal shift |
Pulmonary infections manifest as lobar consolidations, patchy bronchopneumonia, or diffuse interstitial patterns (frequently seen in viral and atypical infections). Lung cancer and metastases present as solitary or multiple pulmonary nodules and masses; spiculation, eccentric cavitation, and diameters greater than 3 cm strongly suggest malignancy.
Congestive heart failure typically displays a progressive progression:
- Cephalization: Redistribution of blood flow to the upper lobe vessels (pulmonary venous hypertension).
- Interstitial Edema: Thickened interlobular septa producing horizontal peripheral Kerley B lines, peribronchial cuffing, and hazy hilar margins.
- Alveolar Edema: Diffuse, fluffy, symmetric bilateral perihilar opacities (“bat-wing” or “butterfly” distribution) accompanied by bilateral pleural effusions.
Verifying Medical Lines, Tubes, and Mobile Radiographs
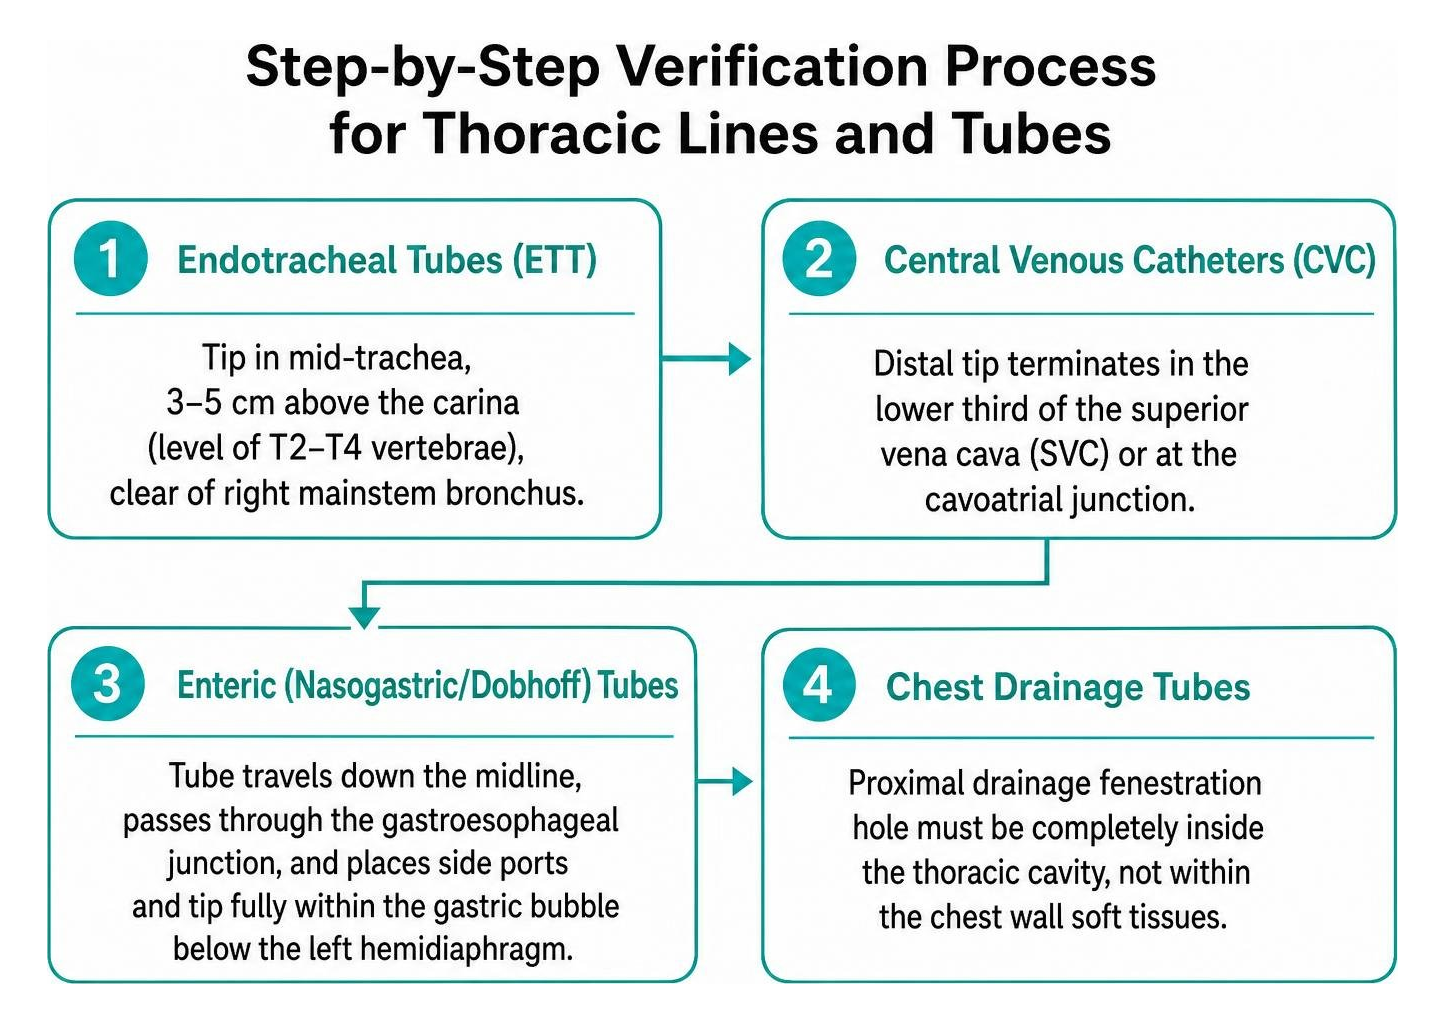
In acute care, checking lines and tubes on portable radiographs is a common task. Providers must verify that life-support hardware is positioned correctly:
- Endotracheal Tubes (ETT): The tip should sit in the mid-trachea, approximately 3 to 5 cm above the carina (at roughly the level of the T2–T4 vertebrae), well clear of the right mainstem bronchus.
- Central Venous Catheters (CVC): The distal tip should terminate in the lower third of the superior vena cava (SVC) or at the cavoatrial junction.
- Enteric (Nasogastric/Dobhoff) Tubes: The tube must travel down the midline, pass through the gastroesophageal junction, and place its side ports and tip fully within the gastric bubble below the left hemidiaphragm.
- Chest Drainage Tubes: The proximal drainage fenestration hole must sit completely inside the thoracic cavity, not within the chest wall soft tissues.
Critical care environments require a strong understanding of trauma and mobile radiography interpretation to account for supine magnification, altered fluid dynamics, and grid cut-off artifacts.
Multimodality Imaging and Thoracic Appropriateness Criteria
While chest radiographs remain the initial investigation for respiratory symptoms, they are not always the definitive modality. Evidence-based clinical guidelines highlight the importance of plain radiography as a foundation for managing global respiratory conditions.
Clinicians must know when to escalate imaging based on the American College of Radiology (ACR) Appropriateness Criteria:
- High-Resolution Computed Tomography (HRCT): Indicated for complex interstitial lung diseases, bronchiectasis, and subtle parenchymal diseases with normal plain films.
- Contrast-Enhanced Chest CT: Essential for staging suspected lung malignancies, characterizing complex pleural processes (distinguishing abscess from empyema), and evaluating mediastinal masses.
- CT Pulmonary Angiography (CTPA): The gold standard for evaluating suspected acute pulmonary embolism.
- Thoracic & Cardiac MRI: Optimal for assessing aortic dissections, myocardial viability, pericardial diseases, and chest wall soft tissue tumors without ionizing radiation.
Earning Continuing Education and Radiography CE Credits
Mastering chest radiography requires ongoing professional practice. Technologists and imaging specialists can explore specialized Radiology CE courses to refine their diagnostic accuracy and fulfill licensure requirements. Completing structured coursework helps you earn radiography CE credits and keep your imaging skills sharp.
Pursuing approved X-Ray CE credits through dedicated continuing education courses for X-Ray technologists helps imaging professionals provide consistent diagnostic value across clinical environments.
Frequently Asked Questions About Chest Radiography Training
What are the most common diagnostic blind spots on a chest radiograph?
The five primary blind spots are:
- The Apices: Overlying clavicles and first ribs can obscure apical lung cancers (Pancoast tumors) or early tuberculosis lesions.
- The Retrocardiac Region: The left lower lobe sits behind the cardiac silhouette; underpenetrated views easily hide retrocardiac consolidations and masses.
- The Hilar Structures: Complex vascular anatomy can conceal central endobronchial lesions and adenopathy.
- The Subdiaphragmatic Space: The posterior costophrenic sulci extend inferiorly; pathology at the bases can hide below the diaphragmatic dome on PA projections.
- The Osseous Thorax: Ribs, scapulae, and sternum can obscure subtle nodular densities and undisplaced fractures.
How can clinicians distinguish between PA and AP chest radiographs?
On a standard PA film, the scapulae are rotated laterally away from the peripheral lung parenchyma, the clavicles angle obliquely downward across the mid-lung fields, and the cardiac silhouette reflects true physiological size. On an AP portable film, the scapulae project over the upper lung fields, the clavicles sit higher and more horizontally across the apices, and geometric magnification makes the cardiac silhouette appear noticeably wider.
When should a clinician advance from a chest radiograph to thoracic CT?
Advancing to thoracic CT is appropriate when:
- An indeterminate solitary pulmonary nodule is identified on a radiograph.
- The patient presents with clinical signs of acute pulmonary embolism despite a normal or nonspecific radiograph.
- There is unexplained hemoptysis with negative or inconclusive plain films.
- Evaluation of mediastinal widening or suspected vascular dissection is required.
- Staging and surgical planning are needed for confirmed thoracic malignancies.
Conclusion
Mastering diagnostic chest radiography is an essential clinical skill. By systematically assessing technical quality, practicing a consistent ABCDE reading pattern, and building familiarity with normal case baselines, healthcare professionals can spot pathology earlier and improve diagnostic confidence.
Ongoing education helps maintain clinical competence and visual discipline. As imaging technology continues to evolve, maintaining your diagnostic foundation remains vital for patient outcomes.
Expand your diagnostic expertise and fulfill your professional licensure requirements today. We invite you to explore accredited Radiology courses at Scrubs CE, where you will find comprehensive, self-paced learning pathways accepted by the AMERICAN REGISTRY OF RADIOLOGIC TECHNOLOGISTS® (ARRT®) and the ASRT®.