
Seeing Through You: A Guide to Radiographic Anatomy Definitions
What Is Radiographic Anatomy?
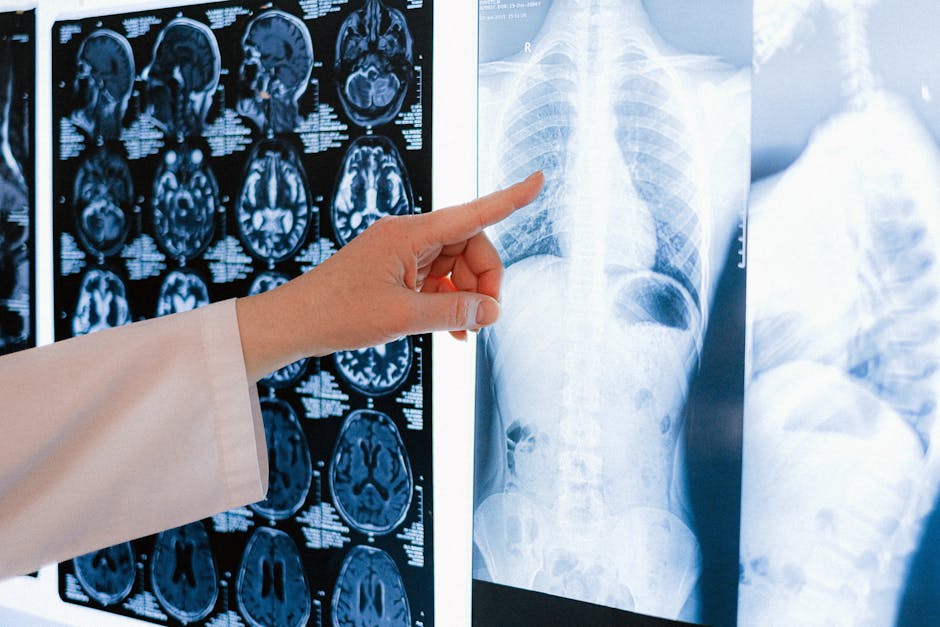
Radiographic anatomy is the study of normal body structures as they appear on medical images. It connects what clinicians know about the body with what they can see on X-ray, CT, MRI, ultrasound, and nuclear medicine studies. In plain radiography, it also means learning how three-dimensional anatomy is compressed into a two-dimensional image.
A practical radiographic anatomy definition includes more than naming bones and organs. It requires recognizing normal position, shape, size, tissue appearance, and common variations so that an abnormal finding can stand out.
For example, bone blocks more X-rays and usually looks white, while air lets more X-rays pass through and looks black. This difference in appearance helps imaging professionals identify anatomy without surgery or invasive procedures.
Understanding these patterns supports accurate positioning, safer image acquisition, and clear clinical interpretation. It is the baseline skill behind everything from checking a chest X-ray to orienting an axial CT image.
I am Zita Ewert, a continuing-education leader for imaging professionals and the driving force behind SCRUBS Continuing Education®. My work developing practical education for radiologic technologists includes helping learners build a reliable radiographic anatomy definition they can apply in everyday imaging practice.
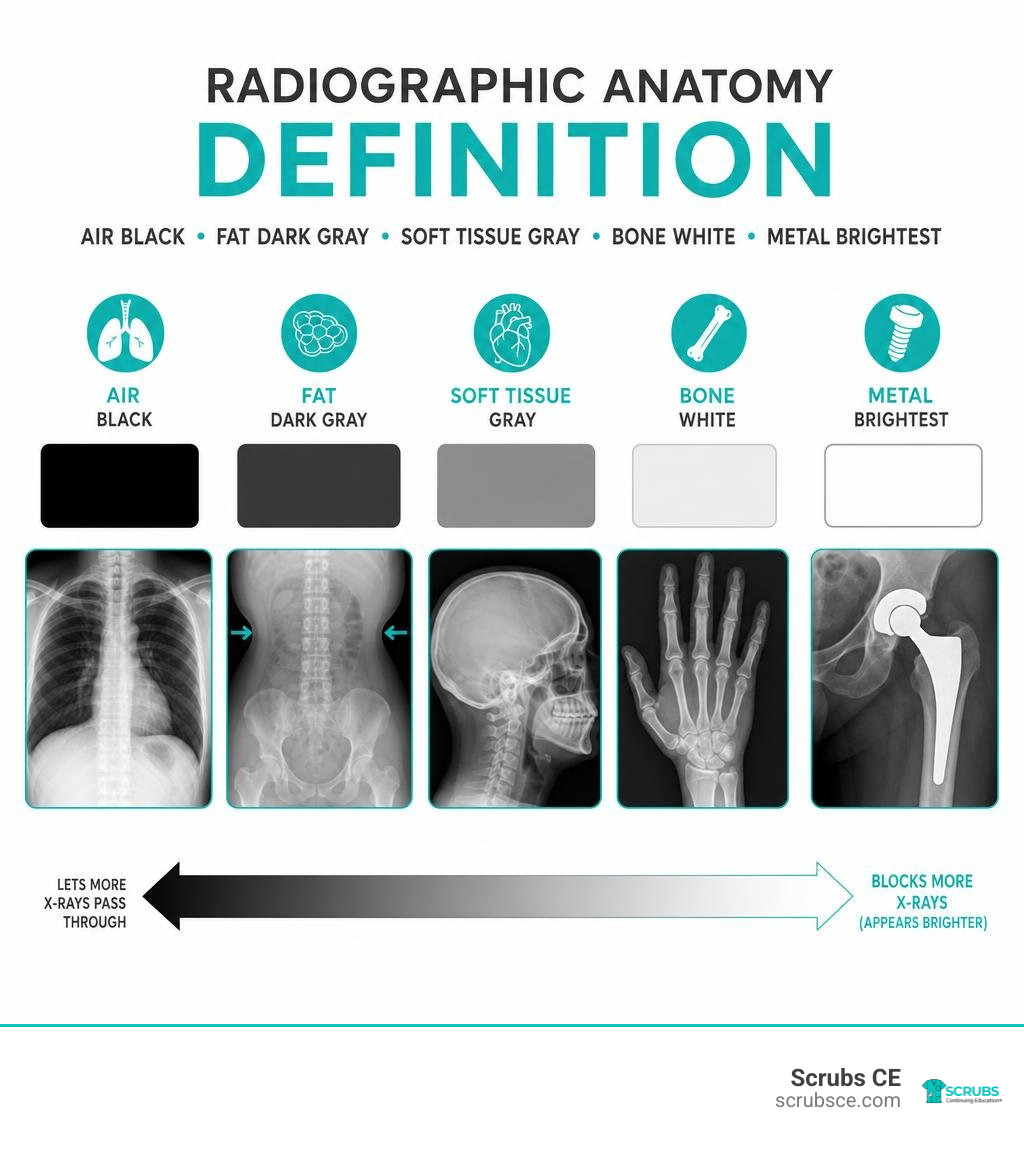
Radiographic anatomy definition terms to learn:
Radiographic Anatomy Definition: Foundations and Principles
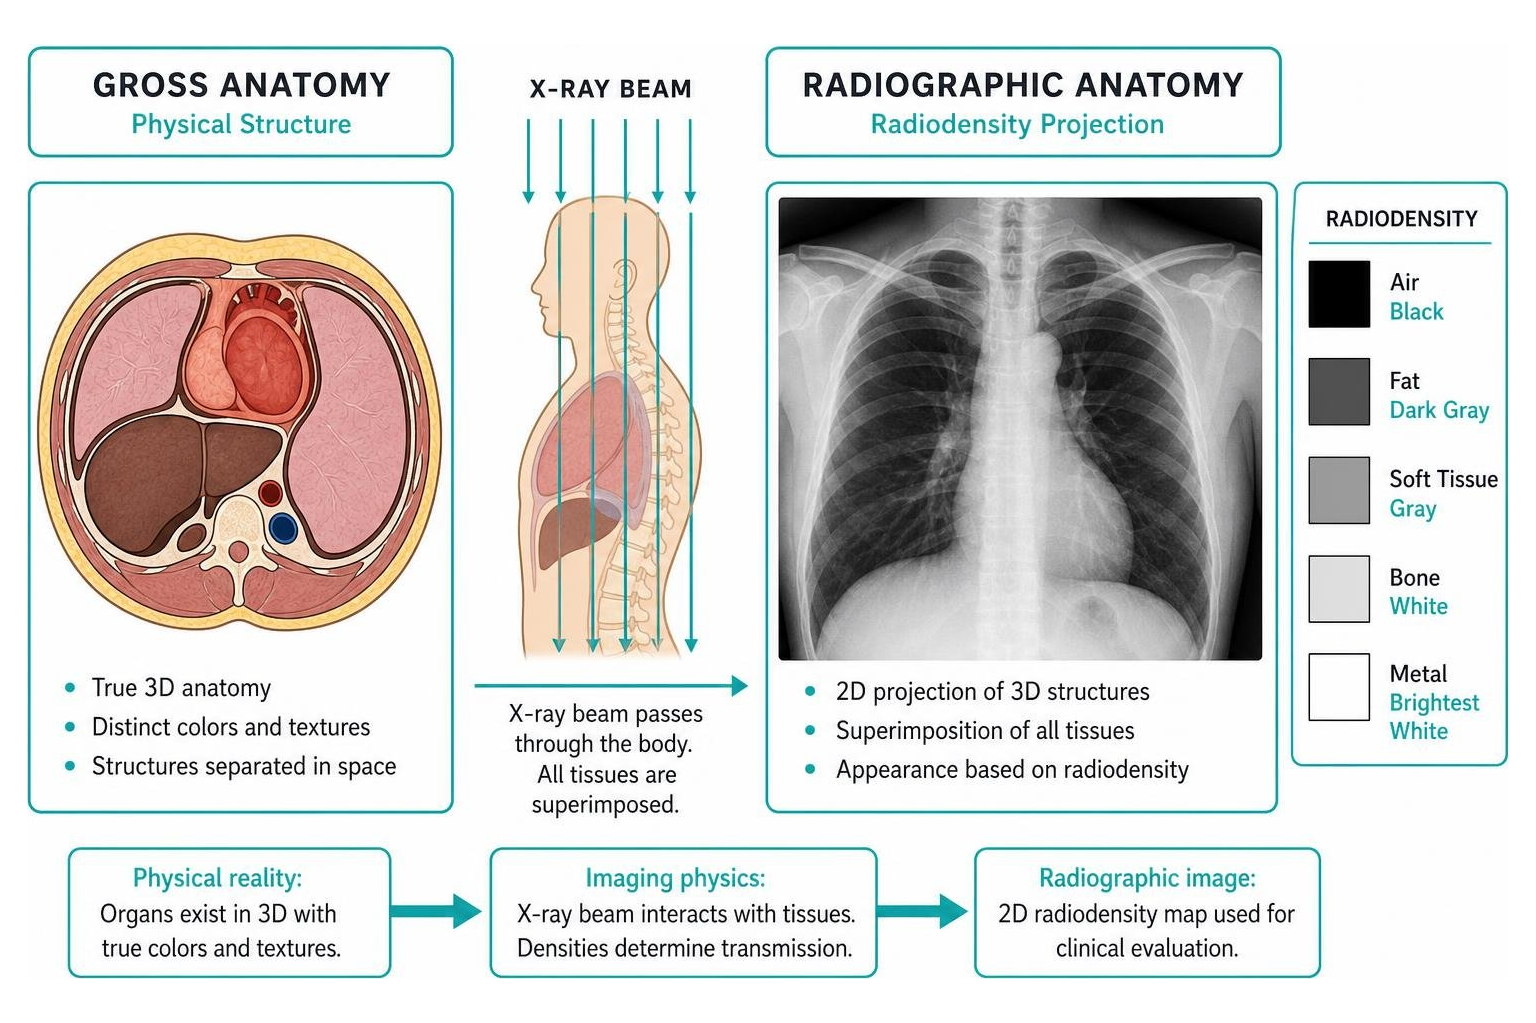
Whenever we evaluate an imaging study, we are translating biological reality into diagnostic visual data. Standard gross anatomy teaches us where an organ sits inside a preserved cadaver, but radiographic anatomy teaches us how that same living organ presents under clinical imaging physics.
When an X-ray beam traverses a patient’s body, the resulting image is a two-dimensional summary projection of three-dimensional anatomical structures. Tissues absorb, scatter, or transmit the beam according to their atomic composition and thickness. Because every layer of tissue along the path of the beam is flattened onto a single planar surface, reading a radiograph requires spatial reconstruction skills and a firm grasp of relative tissue density.
Radiographic Anatomy Definition and Scope
Radiographic anatomy—often termed radiological anatomy or radioanatomy—is the specialized study of internal human morphology through non-invasive medical imaging modalities. Rather than dissecting layers of tissue with a scalpel, we inspect bones, visceral organs, vascular pathways, and neural bundles in their functional, living state.
As detailed in classic medical literature such as Chapter 5: Radiological anatomy, diagnostic images allow clinicians to detect deep-seated systemic disease before gross structural distortion occurs. The scope of radiographic anatomy spans from primary skeletal osteology to advanced multi-slice cross-sectional maps, serving as the bridge where theoretical morphological science meets real-world clinical medicine.
How Radiographic Anatomy Differs from Standard Anatomy
Standard gross anatomy relies on physical inspection, tactile feedback, and structural dissection. In a laboratory setting, a muscle is visibly red-brown, adipose tissue is distinctly yellow, and blood vessels can be physically separated from adjacent nerve trunks.
In contrast, radiographic anatomy relies entirely on differential radiodensity and physical energy interactions:
- Superimposition: Structures situated along the same projection axis cast overlapping shadows on planar films.
- Tissue Homogeneity: Soft-tissue structures such as the heart, liver, blood, and skeletal muscle share almost identical physical densities to water, rendering them uniform shades of gray on conventional radiographs unless separated by natural fat planes or contrast agents.
- Dynamic Living Motion: Unlike static cadaveric models, living organs constantly shift. The stomach contracts, the diaphragm elevates during exhalation, and the heart pulsates, making clinical understanding of living morphological movement essential when decoding pathological anatomy.
Radiology vs Radiography: Roles and Practice
While the terms are often used interchangeably outside the clinic, Radiology and Radiography represent distinct, complementary professional domains:
- Radiography is the diagnostic discipline and technical process of capturing medical images. A radiologic technologist (or radiographer) manages patient positioning, sets technical radiation exposure factors (kVp and mAs), ensures radiation safety, and captures high-quality diagnostic views. In the United States, radiographers undergo intensive 2-to-4-year degree programs and must meet stringent anatomy and physiology licensure requirements to practice.
- Radiology is the branch of medicine dedicated to interpreting diagnostic images, diagnosing disease, and performing image-guided interventional procedures. A radiologist is a specialized medical doctor (MD or DO) who completes four years of medical school followed by four to five years of dedicated residency and fellowship training.
| Professional Role | Primary Education Pathway | Core Clinical Focus | U.S. Median Salary (Recent Data) |
|---|---|---|---|
| Radiologic Technologist (Radiographer) | 2-year Associate or 4-year Bachelor’s degree | Image acquisition, patient positioning, radiation safety, ALARA compliance | $77,660 (2024) |
| Radiologist | 4-year Undergrad + 4-year Med School + 4-5-year Residency | Diagnostic image analysis, clinical reporting, image-guided interventions | $239,200 (2023) |
Both roles require mastery of foundational Radiology anatomy texts to communicate clinical findings accurately across interdisciplinary healthcare teams.
Diagnostic Imaging Modalities and Tissue Radiodensity Principles
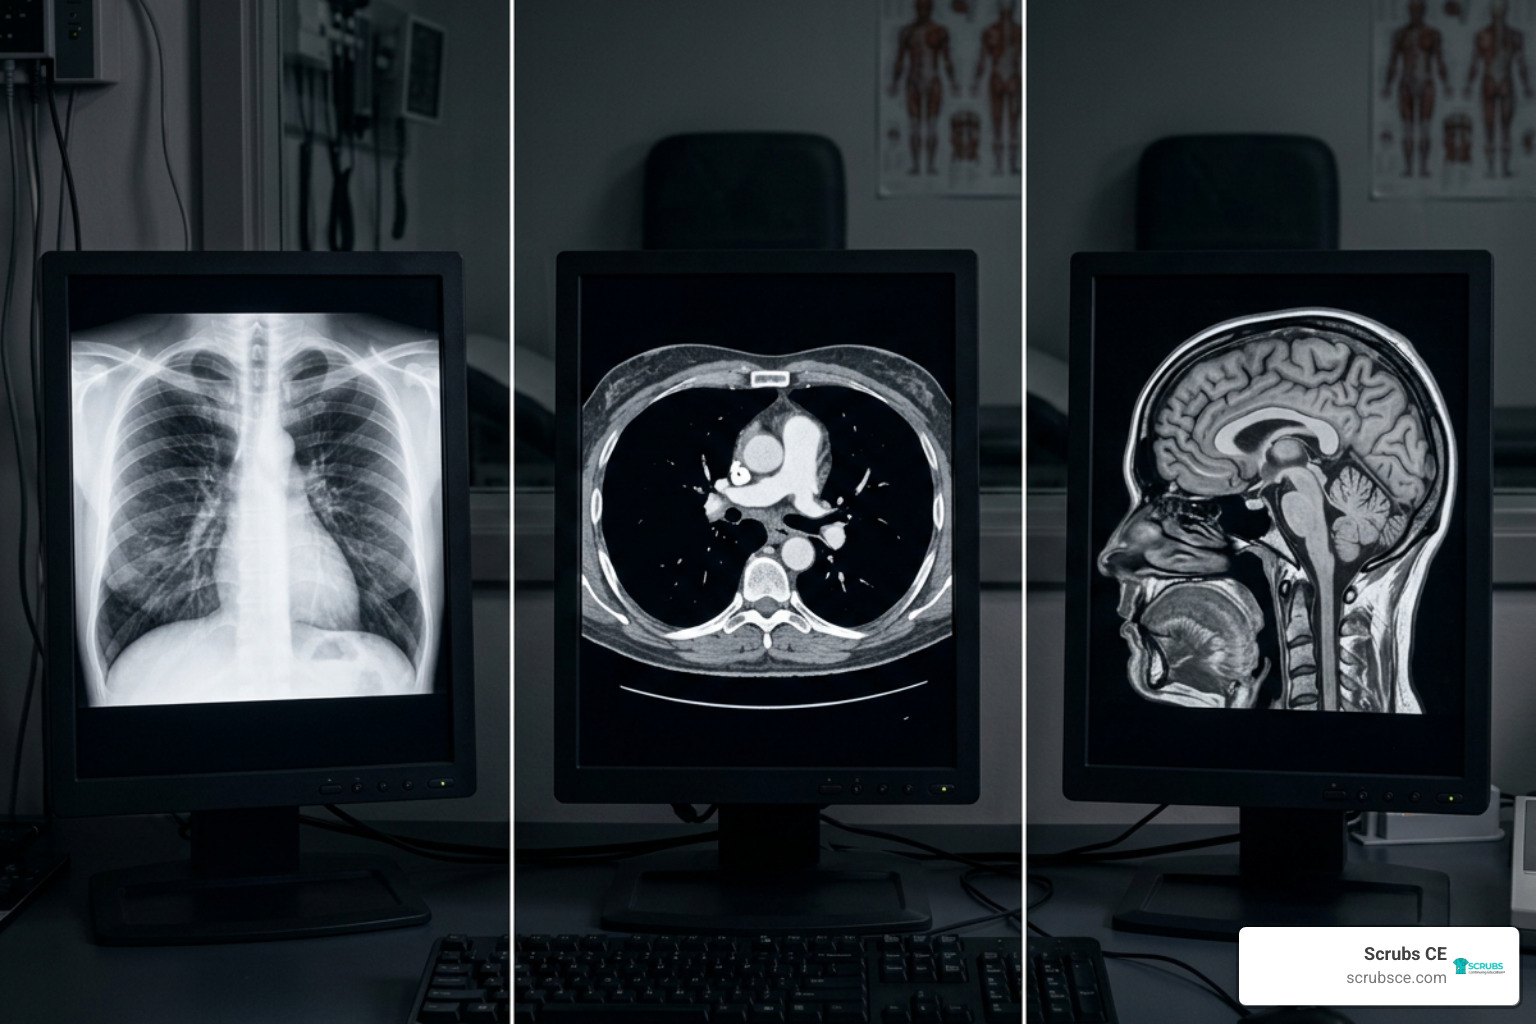
Different diagnostic imaging modalities leverage distinct physical properties of the human body to visualize anatomy.
Radiographic Density: From Radiopaque to Radiolucent
On projection radiographs and fluoroscopic screens, anatomical visibility depends on how much of the primary X-ray beam is attenuated (absorbed or scattered) by the body’s tissues. We categorize radiographic appearances across five fundamental densities:
- Air / Gas (Most Radiolucent): Absorbs the fewest X-ray photons. It allows the radiation beam to pass unimpeded to the image receptor, appearing jet black (e.g., trachea, lungs, gastric air bubble).
- Fat: Absorbs slightly more radiation than air but less than water. It appears as a dark gray stripe or halo, forming critical natural borders (such as the pronator fat stripe or perirenal fat) that delineate muscles and organs.
- Water / Soft Tissue: Possesses intermediate density. Muscle, blood, solid viscera (liver, spleen, kidneys), and cartilage all attenuate similar amounts of radiation, presenting as uniform medium gray.
- Bone / Calcium (Most Radiopaque Natural Tissue): Contains high-atomic-number calcium and phosphorus, absorbing substantial radiation. Bone appears bright white on standard radiographs (e.g., cortical bone, trabecular networks).
- Metal (Enamel / Foreign Body / Contrast Media): Possesses extreme physical density and high atomic numbers, blocking virtually all primary X-ray photons. Metal appears brilliant, stark white (e.g., surgical clips, orthopedic implants, barium contrast).
| Fundamental Density | Physical Characteristics | Standard X-ray Appearance | CT Appearance (Hounsfield Units) | MRI Appearance (T1 / T2) |
|---|---|---|---|---|
| Air | Lowest physical density | Jet Black | Very Low (-1000 HU) | Signal void (Black) / Signal void (Black) |
| Fat | Hydrocarbon-rich lipid tissue | Dark Gray | Low (-120 to -90 HU) | High signal (Bright) / Intermediate-High signal |
| Soft Tissue / Water | Cellular protein / fluid | Mid Gray | Intermediate (0 to +40 HU) | Low-to-Mid signal / High signal (Water bright) |
| Dense Bone | Highly mineralized calcium matrix | Bright White | Very High (+400 to +1000+ HU) | Low signal (Black cortex) / Low signal |
| Metal / Contrast | Artificial dense material | Stark White | Extremely High (>+1000 HU) | Variable / Severe susceptibility artifact |
Cross-Sectional Modalities: CT Hounsfield Units and MRI Weighting
Computed Tomography (CT) eliminates superimposition by rotating an X-ray tube and detector array 360 degrees around the patient, generating thin axial slices (typically 1 mm to 5 mm). Tissue radiodensity on CT is quantified mathematically on the Hounsfield Unit (HU) scale, calibrated precisely between air (-1000 HU), pure water (0 HU), and dense cortical bone (+1000 to +3000 HU).
Magnetic Resonance Imaging (MRI) does not use ionizing radiation. Instead, it places the patient inside a powerful magnetic field and applies radiofrequency (RF) pulses to manipulate the spin of hydrogen protons in tissue water and fat. We distinguish normal tissues by altering the pulse timing:
- T1-Weighted Sequences: Maximize the signal from fat. Adipose tissue is bright (white), while water, cerebrospinal fluid (CSF), and simple effusions are dark (black). T1 sequences excel at depicting structural anatomy and cortical boundaries.
- T2-Weighted Sequences: Highlight fluids. Water, CSF, edema, and inflammatory exudates shine bright (white), while dense fibrotic tissue remains dark. T2 sequences are ideal for identifying pathological swelling and joint effusions.
The Expanding Role of Contrast Agents in Radiographic Anatomy Definition
When adjacent soft-tissue structures exhibit nearly identical radiodensity—such as bowel loops lying against pelvic muscle—we introduce artificial contrast agents to outline anatomical lumens and vascular networks:
- Positive Radiopaque Contrast Media: Agents containing high-atomic-number elements like barium sulfate ($Z=56$) or iodine ($Z=53$) absorb large quantities of X-ray photons, highlighting the gastrointestinal tract, renal collecting systems (intravenous urography), and arterial trees (computed tomography angiography).
- Negative Radiolucent Contrast Media: Gases such as air, carbon dioxide, or nitrogen absorb fewer photons than surrounding tissues, expanding hollow organs (e.g., during double-contrast barium enemas or CT colonography).
- Paramagnetic MRI Contrast: Gadolinium-based chelates shorten local T1 relaxation times, causing hypervascular lesions, inflamed synovial tissues, and disrupted blood-brain barriers to light up brightly on T1-weighted sequences.
Anatomical Planes, Body Habitus, and Skeletal Landmarks
Accurate radiographic positioning requires aligning external surface landmarks with internal skeletal structures and imaginary reference planes.
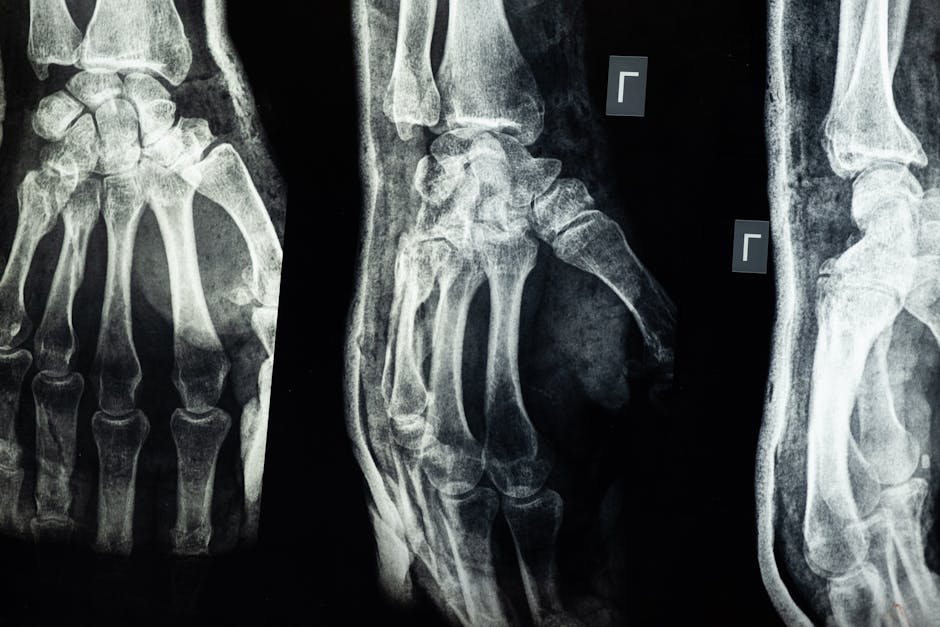
Fundamental Body Planes and Positioning Terminology
According to standard radiographic positioning terminology, the human body in the anatomical position is divided using four primary planes:
- Sagittal Plane: A vertical plane dividing the body into right and left segments. The midsagittal (median) plane divides the body into equal symmetrical halves.
- Coronal (Frontal) Plane: A vertical plane oriented at a 90-degree angle to the sagittal plane, dividing the body into anterior (front) and posterior (back) sections. The midcoronal plane divides the body into equal anterior and posterior segments.
- Horizontal (Transverse / Axial) Plane: A crosswise plane passing horizontally through the body at right angles to both sagittal and coronal planes, dividing anatomy into superior (upper) and inferior (lower) portions.
- Oblique Plane: Any plane passing through the body at an angle that is not parallel to the sagittal, coronal, or horizontal planes.
Projections describe the path of the central X-ray beam:
- Anteroposterior (AP): The beam enters the anterior surface and exits posteriorly.
- Posteroanterior (PA): The beam enters the posterior surface and exits anteriorly (the standard projection for chest radiographs to minimize cardiac magnification).
- Lateral: The beam enters one side of the body and exits the opposite side.
Body Habitus and Internal Organ Variations
A patient’s body habitus—their fundamental physical build and trunk shape—governs the size, shape, position, and movement of internal thoracic and abdominal organs, independent of their height or weight:
- Sthenic (50% of the population): The average, standard athletic build. The stomach is J-shaped, the duodenal bulb lies at the L1–L2 level, and the colon forms an evenly distributed frame around the abdominal cavity.
- Hyposthenic (35% of the population): A slender build slightly elongated compared to sthenic. Together, sthenic and hyposthenic types represent more than 85% of the general population.
- Asthenic (10% of the population): A very slender, frail build with a narrow, shallow thorax. The diaphragm sits low, the lungs are long, the heart appears vertical, and the stomach lies vertically along the midline, dipping down into the true pelvis.
- Hypersthenic (5% of the population): A broad, stocky build with a wide, deep thorax and short abdomen. The diaphragm is pushed high, the ribs lie horizontal, the stomach sits high and transverse across the upper abdomen, and the gallbladder can sit up to 8 inches higher and further lateral than in an asthenic patient.
Adjusting automatic exposure control (AEC) chambers and centering points based on habitus prevents clipped anatomy and repeat exposures.
Osteology and Skeletal Landmarks in Radiographic Evaluation
The adult human skeleton comprises 206 primary bones, divided into:
- The Axial Skeleton (80 bones): Forms the central axis, including the skull, hyoid, vertebral column, ribs, and sternum.
- The Appendicular Skeleton (126 bones): Comprises the upper and lower limbs and the pectoral (shoulder) and pelvic girdles.
Standard references like the WHO manual of diagnostic imaging emphasize identifying specific osteological zones on musculoskeletal radiographs:
- Diaphysis: The primary ossification center forming the dense, compact tubular shaft of a long bone surrounding the radiolucent medullary cavity.
- Epiphysis: The secondary ossification center occurring at the articular ends of long bones.
- Physis (Epiphyseal Growth Plate): The radiolucent cartilaginous band separating the epiphysis and metaphysis in pediatric skeletons. Ossification starts during the second embryonic month and completes around age 21 when the radiolucent plate ossifies into a faint, radiopaque epiphyseal line.
Systematic Clinical Interpretation: From Plain Films to Advanced Cross-Sectional Scans
Accurate clinical image analysis relies on structured, repeatable evaluation protocols rather than random visual scanning.
The ABCD Rule for Chest Radiograph Interpretation
The chest radiograph (CXR) is the most frequently performed imaging exam. A standard posteroanterior (PA) view should be reviewed systematically using the classic ABCD mnemonic:
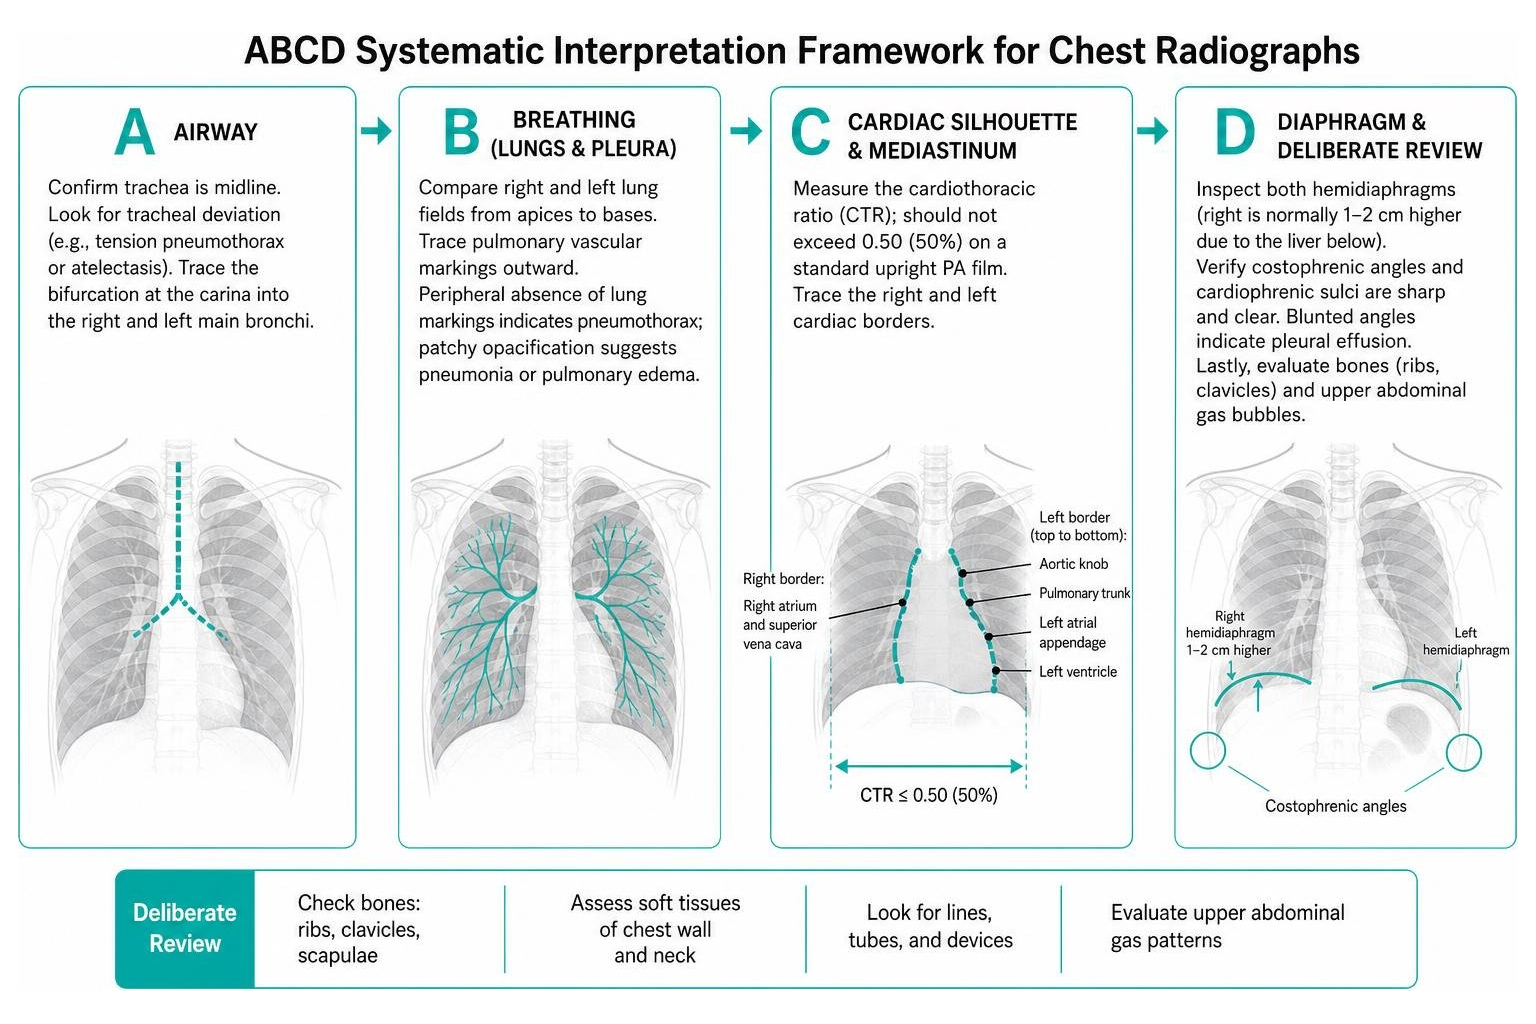
- A – Airway: Confirm that the trachea is midline. Look for tracheal deviation caused by tension pneumothorax or atelectasis, and trace the bifurcation at the carina into the right and left main bronchi.
- B – Breathing (Lungs & Pleura): Compare the right and left lung fields sequentially from apical zones to lung bases. Trace the pulmonary vascular markings outward; peripheral absence of lung markings indicates a pneumothorax, while patchy opacification signals pneumonia or pulmonary edema.
- C – Cardiac Silhouette & Mediastinum: Measure the cardiothoracic ratio (CTR), which should not exceed 0.50 (50%) on a standard upright PA film. Trace the right border (formed by the right atrium and superior vena cava) and the left border (aortic knob, pulmonary trunk, left atrial appendage, and left ventricle).
- D – Diaphragm & Deliberate Review: Inspect both hemidiaphragms (the right is normally 1–2 cm higher due to the liver below). Verify that both costophrenic angles and cardiophrenic sulci are sharp and clear. Blunted angles point to pleural effusion. Lastly, evaluate the bones (rib fractures, clavicles) and upper abdominal gas bubbles.
CT Orientation and the RALP Rule
Cross-sectional axial CT scans follow a strict viewing convention: you are looking at the slice from the patient’s feet, looking upward toward their head, with the patient lying supine.
To orient any axial CT image instantly, apply the RALP rule around the clockface:
- 9 o’clock = Right (R): The patient’s right side is displayed on the left side of your monitor.
- 12 o’clock = Anterior (A): The patient’s front (sternum, anterior abdominal wall) points toward the top of the monitor.
- 3 o’clock = Left (L): The patient’s left side is displayed on the right side of your monitor.
- 6 o’clock = Posterior (P): The patient’s back (spine, dorsal muscles) rests at the bottom of the monitor.
Regional Anatomy Breakdown: Head, Spine, Abdomen, and Extremities
- Head & Neuroimaging: On non-contrast head CT, bone appears dense white (+1000 HU), cerebrospinal fluid within the ventricles appears dark gray/black (0–10 HU), and cerebral gray matter appears slightly lighter gray (+35 to +40 HU) than white matter (+25 to +30 HU) because gray matter contains less lipid myelin.
- Spine: Lateral cervical radiographs must demonstrate the base of the skull down through the C7–T1 junction. Radiographers evaluate four continuous lordotic lines: the anterior vertebral line, posterior vertebral line, spinolaminar line, and posterior spinous process line. Any focal disruption in these smooth arcs indicates a spinal fracture or ligamentous dislocation.
- Abdomen: Normal supine abdominal radiographs show small amounts of gas within the stomach and scattered loops of colon. Freely floating crescent-shaped gas beneath the right hemidiaphragm on an upright radiograph (pneumoperitoneum) is an acute surgical emergency indicating a perforated hollow organ.
- Extremities & Joints: Musculoskeletal interpretation relies heavily on evaluating adjacent soft-tissue fat pads. On a true lateral elbow radiograph, the displacement or elevation of the anterior or posterior fat pad (the “sail sign”) reveals occult, non-displaced intra-articular fractures (such as a radial head fracture in adults or a supracondylar fracture in children) that might otherwise be invisible.
Frequently Asked Questions About Radiographic Anatomy
What is the radiological joint space?
The radiological joint space is the radiolucent (dark) interval seen between the radiopaque subchondral bone ends of opposing bones on a radiograph. In a healthy adult, this space measures between 2 mm and 5 mm in width. It is not empty air; it represents the thickness of the two opposing layers of uncalcified articular hyaline cartilage plus the synovial fluid lubricating the joint cavity. Joint space narrowing is a classic sign of osteoarthritis.
Why are orthogonal views necessary when evaluating radiographs?
Because a conventional radiograph is a two-dimensional flat representation of three-dimensional anatomy, structures along the beam path are superimposed. A single projection cannot provide depth localization. Taking at least two orthogonal projections at a 90-degree angle to each other (such as an Anteroposterior view paired with a Lateral view) enables clinicians to pinpoint foreign body locations, identify hidden fracture lines, and evaluate anatomical displacement accurately.
What are the main body habitus classifications in radiography?
The four standard classifications are:
- Sthenic (50%): Average, well-proportioned body build.
- Hyposthenic (35%): Moderately slender build.
- Asthenic (10%): Very slender, elongated trunk with low-lying pelvic organs.
- Hypersthenic (5%): Broad, stocky, wide trunk with high, transverse thoracic and abdominal organs.
Together, the sthenic and hyposthenic types account for 85% of all imaging patients.
Master Radiographic Anatomy and Advance Your Imaging Career
Mastering radiographic anatomy is an ongoing journey that sharpens your diagnostic instincts, reduces repeat exposures, and elevates patient care. Whether you are centering the central ray over an elusive landmark or reviewing cross-sectional tissue borders on an axial slice, a firm grasp of radioanatomy remains the ultimate foundation of medical imaging.
For imaging professionals looking to stay at the cutting edge of clinical practice while fulfilling mandatory continuing education requirements, SCRUBS Continuing Education® provides accessible, self-paced courses.
Advance your professional credentials, satisfy your ARRT® and state licensing requirements, and broaden your imaging expertise through our comprehensive anatomy for radiographers course series. Enjoy instant certificate generation and elevate your clinical confidence on every shift!